Tuesday, October 30, 2012

Halloween Treats


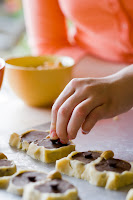
My mother made owl cookies every Halloween when I was growing up. Charming and delicious, they were always a hit with my friends. The dough is a basic refrigerator-cookie dough that is made ahead of time and can also be frozen. Children love to assemble and decorate these cookies, which features chocolate chips for eyes and a giant salted cashew for a nose to make up the perfect owl face.


owl cookies


This recipe makes a good-sized batch of large cookies for Halloween school parties or Halloween parties at home.

owl cookiesowl cookies


MAKES ABOUT 18 COOKIES

3 cups all-purpose flour
3 teaspoons baking powder
1/2 teaspoon sea salt
1 1/4 cups (2 1/2 sticks) unsalted butter at room temperature
1 1/3 cups sugar
2 large eggs
4 teaspoons vanilla extract
6 ounces semisweet chocolate chips, melted

Semisweet chocolate chips
About 18 whole roasted and salted cashews (or candy corn, if nut allergies are a concern)

  1. In a large bowl, combine the flour, baking powder, and salt.
  2. In another large bowl, using an electric mixer, beat the butter until soft. Continuing to beat, add the sugar slowly, then beat until the mixture is very light and fluffy. Mix in the dry ingredients.
  3. In a small bowl, beat together the eggs and vanilla, then add them to the dough a little at a time, mixing well after each addition.
  4. Transfer about one-third of the dough to a separate bowl and stir in the melted chocolate chips to make a chocolate dough. Shape the chocolate dough into a 10-inch-long log, working very quickly before the chocolate solidifies. Wrap in wax paper and put in the refrigerator.
  5. Roll out the remaining (vanilla) dough into a long rectangular shape as long as the chocolate log. Set the chilled chocolate log in the center of the vanilla rectangle and wrap it up so that a cross-section resembles a bullseye, with a vanilla out layer and a chocolate center. Wrap the log in wax paper and refrigerate until firm, at least 2 hours. (You can also freeze the dough for up to a month.)
  6. Preheat the oven to 375 degrees Fahrenheit. Butter 2 baking sheets. Place the chocolate chips and cashews in small bowls for easy access.
  7. Unwrap the logs and cut them into 1/8-inch slices. Join the two slices together by placing them side by side on a baking sheet and pinching them. Slightly pinch the two opposite sides of the rounds into pointy ear shapes. Place a chocolate chip upside down in the center of each chocolate eye, then embed a cashew into the center of the two joined circles. Repeat with the remaining slices, spacing the owls 2 inches apart on the baking sheets.
  8. Bake for about 10 minutes, watching closely, until lightly browned. Transfer the cookies to a wire rack to cool completely.
  9. Store the cookies in a large tin, with the layers separated by sheets of wax paper. Keep the tin in a cool place until Halloween, or freeze the cookies ahead of time. Be careful not to fill the tin too full to avoid breaking the two halves apart.
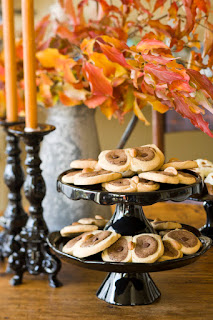
  10. Serve on a shiny black cake pedestal for a very spooky effect.
halloween
The owl cookies display on served on the Rococo Noir pedestals with the Dauphine candlesticks.


Enjoy!


www.rosannainc.com

Friday, October 26, 2012

Slow Down With a Trip to the Country

I've teamed up with Lisa from Moore Minutes again this month! Stop by her blog to read all about her family's autumnal picnic.


One way to break up the hectic days of fall, with its busy schedules of school activities, sports events, parties, work, and homework, is a Saturday drive to a nearby orchard for apple picking or nut gathering. As young girls, my sisters and I would accompany our mother each fall to the orchards around Portland where we loaded baskets full of sweet, crisp fresh apples the Pacific Northwest is famous for. Mother would make them into applesauce - canned for use throughout the year, of course - and they'd appear all winter in her comforting baked apple dumplings and famous apple pies. Most varieties of apple store very well, and fresh, delicate slices would find their way from the cooler in our garage into most of our packed lunches.


Another favorite of my mother's were the delicious nuts grown in Oregon. There are those who love nuts and those who don't. We were nut people! There were always huge bowls full of multiple varieties of nuts and crackers ready for easy snacking. A vegan's paradise, Oregon offers a mind-boggling array of the delicious and vitamin-rich foods. Hazelnuts are grown there in great quantities, making Oregon one of the top exporters in the world. English walnuts and chestnuts were also sought out by my mother in the fall.


Gathering food from the countryside can be difficult in these buy times, but I believe that if we make the choice to make quality foods a part of our lives, the ritual of harvesting can be integrated into our routine. To be in touch with nature ensures us a food supply that will truly nourish our bodies and keep us connected to the earth.


www.rosannainc.com

Thursday, October 25, 2012

Ten Steps to a Successful Pumpkin Carving


To see my tips for having a more adult-oriented Halloween, stop by Taryn Cox THE WIFE to check out my suggestions.


1. Pick out pumpkins that are shaped well for carving, whether you prefer smooth globes for happy faces or misshapen blobs for monstrous visages.
2. Spread out old newspapers on a big table or on the floor and get ready to carve.
3. Have the following items handy:
     a. Large bowls for the pulp.
     b. Small bowls for saving the seeds.
     c. Large serving spoons for scooping out the inside of the pumpkins.
     d. Carving tools.
     e. Paper towels for wiping hands and cleaning off the pumpkin's face.
     f. Felt-tip pen for drawing the design on the pumpkin.
     g. Candles.
4. Draw a circle around the top that you will cut to open the pumpkin, making sure it is big enough to reach inside to clean the pumpkin. Alternatively, cut a hole in the bottom of the pumpkin; that way, you can easily light a candle in a candle holder or on a plate, then carefully lower the carved pumpkin over the candle - avoiding the timeless annoyance of lighting a candle through the top of the gourd.
5. Clean out the inside of the pumpkin thoroughly, taking out the pulp and separating the pulp from the seeds. Save the seeds for cleaning later and then roasting for a delicious fall snack!
6. Pick the side of the pumpkin that has the most personality. Sometimes dimples and imperfections on a pumpkin's face can add real character and individuality to a jack-o-lantern.
7. Sketch out the design of the face on a sheet of paper, then use a black felt-tip pen to copy the design directly onto the pumpkin.
8. Carve cautiously. Even if your child is mature enough to carve on her own, make sure to watch closely. If you have younger children, let them be the scoopers and the separators of the seed and the pulp (they'll have a grand time with the goop and gore), or put them in charge of drawing the design on the paper.
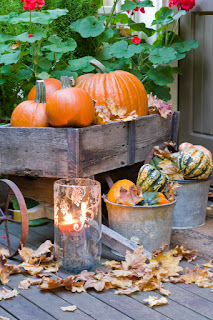
9. When carved, place your pumpkins outside near your front door. Make sure they are not exposed to rain or other elements, which could cause them to mold and break down more quickly. I use stools, benches, and small wooden foot rests to make different levels of display. If you have stairs that lead up to your home, place a pumpkin or to on each step leading to your front door.
10. Clean up the mess. Have a large plastic garbage bag nearby to throw all the pulp and discarded shards of pumpkin into. Save the bowl of seeds and take them to the kitchen.

halloween

One last thing: make sure to carve the pumpkin just before October 31st so they don't become moldy and collapse - unless that's the look you want! Three days is a good window of time to ensure fresh, crisp pumpkins that will hold up through Halloween evening.


Happy Halloween!


www.rosannainc.com

Monday, October 15, 2012

Embrace Sports as a Lesson in Living

I'm teaming up with Family Eats again this month for a blog collaboration. Pop on over for recipes on delicious after-practice and after-game snacks to keep your athletes healthy and well-fed!

kids playing soccer


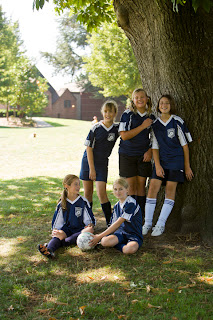
Throughout their childhoods, both my daughters have played sports. Soccer, basketball, volleyball - whatever was in season, they played it. As part of a generation whose girls were not encouraged to be athletes, this was an adjustment for me.

When my eldest daughter's inaugural soccer season began, I was lost. I didn't know the game or the terms, and I went to her matches reluctantly. Each was scheduled for as early as possible on Saturday mornings at some far-off field that always took forever to find. The fall weather was inevitably cold and rainy, and those two miserable hours always ended with a sick little girl. Or so it seemed.

Then my second daughter began to play. By this time I'd learned the rules, and I found myself actually looking forward to the events as opportunities to connect with the other team parents. These gatherings helped me to feel like a part of a community of like-minded parents. Together we cheered our daughters to victory and comforted and encouraged them when they lost. And as if by magic, everything I thought had been out of my control changed. The match locations were closer to home, the weather was wonderful, and my daughter never got sick after a rainy game. Interesting what a change in attitude can do!

soccer team


The importance of teamwork, having tenacity in difficult circumstances, and a feeling of self-worth were only some of the valuable life lessons the girls learned during their time on the field and on the court. I'm so pleased that my girls are growing up in a society that doesn't bar them from certain activities because they are female. I revel in their triumphs and defeats, knowing they're learning invaluable lessons either way. I come away from those games inspired and motivated, knowing their futures will be bright.

soccer team


Children's sports activities are an important part of a child's education. They teach the child teamwork, discipline, and how to build solid relationships with other teammates and coaches. There is always some type of sport available during the year. Encourage your children to at least try a sport; no matter how athletically inclined they are, they will surely benefit from the experience of being part of a team and working toward a goal together, building a strong sense of what lies ahead for them in the adult world. Sports involvement is particularly beneficial to young women, as it can provide them with a feeling of empowerment and self-esteem.


www.rosannainc.com

Thursday, October 4, 2012

October is Breast Cancer Awareness Month


October is Breast Cancer Awareness Month. During the month of October a portion of proceeds from RosannaInc.com web sales will go to the UW Medical Center to help find a cure for this terrible disease. Together we can make a difference!


www.rosannainc.com

Save the Date!


More details coming soon!


www.rosannainc.com

Wednesday, October 3, 2012

Go Red For Women 2013


I am so thrilled to announce that I have been named the chair of the 2013 Go Red for Women Luncheon!

The American Heart Association faced a challenge in 2004: women were not paying attention to their heart health. Heart disease, the number one killer of women, claims the lives of nearly 500,000 American women each year. The American Heart Association created Go Red For Women in order to raise awareness of the disease while empowering women to take charge of their heart health in a passionate, emotional, and social atmosphere.

Healthful living and eating well are issues close to my heart and the focus of my chairmanship. During my time as chair I plan to establish a children's p-patch at a local charity and food bank that will educate youth on nutrition in an interactive environment. I also intend to involve the Seattle-area community in the luncheon to make it the event fun and fashionable for the women attending.

To learn more about the American Heart association and Go Red, please visit http://www.GoRedForWomen.org.


www.rosannainc.com

Tuesday, October 2, 2012

Creating a Culture at Home: An Etiquette Perspective by Anna Post

Last year I was able to meet with Anna Post. Our philosophies are very similar when it comes to etiquette, entertaining, and creating traditions. I am honored that she has once again found the time to write a guest post for my blog about creating a culture at home. Thank you so much, Anna.

The word culture brings to mind everything from cities to civilizations. But culture can apply anywhere there are groups of people living or working together on any scale. The culture you create in your home is one of the most important because it affects how you interact with your loved ones, how your children are raised, and how guests feel in your home.  How does etiquette figure into all this?  Respect, consideration, and honesty (the tenets of etiquette) are necessary when creating this culture.


Several factors influence your at-home culture:
  • Physical appearance - How your home is decorated. Is it impeccably clean or comfortably cluttered? Does it have a casual feel or a more formal one?
  • Emotional atmosphere - How people in your home interact. Will they be greeted with bug hugs and shouts of joy or simple handshakes?
  • Standards - The house rules. Does everyone take his or her shoes off at the door? What kind of language is appropriate?
  • Traditions - Let everyone know what to expect and what is expected of them. How are birthdays to be celebrated? Who carves the turkey on Thanksgiving?
place setting

Together, these factors weave together the unique culture of your home. Each is important to consider when deciding what environment you want to live in. Raising children is one of the mot important reasons for this.

The home is where children learn standards essential to becoming considerate, respectful, honest people. To be considerate, a person has to think about others, and in this sense, thinking is learned and refined with practice. Family life presents daily opportunities for lessons in thoughtfulness and consideration.


tea

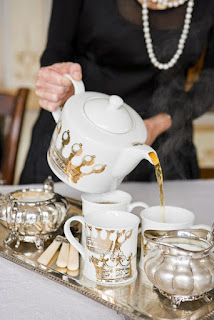
Respect is simple. If everyone in the home treats themselves and others with respect, then they will become respectful young adults. This shows that you care about yourself and the people around you.

Finally, we have honesty. Simply put, if children see honest behavior, that is what they will learn. If they observe deception and little white lies, they that is what they will learn.

Understanding these three principles makes it easier for kids to appreciate the standards and traditions they live with and also to understand how they can be different home to home. It's important for parents to be clear that their children must respect the standards and traditions of the homes they visit. They learn this both from their own parents and from the people they visit.

For more information about etiquette in the modern world, please visit EmilyPost.com or read the Emily Post's Etiquette, 18th Edition.


www.rosannainc.com